Visual representation
Luna is a data processing language and like every language it provides a syntax. However, in contrast to majority of languages Luna has more than one syntax representation – visual and textual. In order to use Luna efficiently you should learn both of them – the visual representation uses the textual one to define component's expressions. This chapter describes the former – visual data flow graph.
While designing the visual representation we've put an enormous emphasis on productivity and ergonomics. Every element and every action was carefully designed to allow you express your thoughts easily, understand the results rapidly and clearly see all the data transformations. You have to learn how to "speak this language", however it's worth doing, as even hardcore coders much prefer using Luna for building high-level data processing workflows than writing code. We are on a mission to constantly improve how you work with Luna, so your feedback and suggestions are very important to us. If you have any ideas related to how the visual representation works, tell us about it!
Navigation
Luna Visual Editor is a canvas allowing you for fluid navigation so you can always focus on what is important at the moment. You can:
- pan the view using two fingers drag gesture or the middle mouse button;
- zoom the view using pinch gesture or the right mouse button;
- select nodes by clicking them or using left mouse button to draw selection area starting from the background;
- dive into nodes by double clicking them;
- view parent nodes by double clicking on the background or using the breadcrumb controls on top of the Visual Editor.
Nodes
Nodes are the most primitive entities in the visual representation, which, together with other nodes, form the data flow graph.
Value nodes
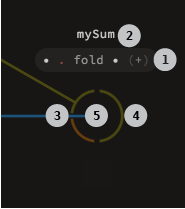
Value nodes are the most common node types. They represent any valid Luna value, including data processing functions. From the high perspective, a value node can generate data, modify it or pass to it some external service like a web service or a database. Value nodes consist of several visual elements:
Node expression 1
The node expression is any valid Luna code, in particular a function name. For example, a node adding two objects is named +.
Node name 2
The node name is a name you give to it to describe its role in the graph. Any other node referencing this one uses this name.
Input ports 3 and output ports 4
Ports are the node's communication gates. Data flows into input ports on the left side, is processed according to the node expression and the result flows out from the output ports on the right side. Port colors indicate what type of data flows through them. You will learn more about data types in the Types 101 chapter.
Self port 5
Luna is an object oriented language. It means that every piece of data that flows between nodes is not just information, it can also respond to your commands. You can for example tell a car to stop, a dog to bark, a number to increase or a list to sort its items. If data is connected to self port, then the node's expression tells it what to do. A rule of thumb is that if you want to process a piece of data, connect it to the self port. You will learn in detail about it in the Making our own type chapter.

Reference nodes
Sometimes you don't want to process data, you want to inspect and deconstruct it instead. Nodes that do not affect the data, but allow you to look into it are called reference nodes. Their usage is covered in detail in the Pattern matching chapter. They contain a special target port 1 which accepts data that you want to inspect.

Creating nodes
Nodes are always created with the help of Luna Explorer, however, there are several options to launch it and guide towards our intentions:
- press the tab key to search across all available components;
- select a node and then press the tab key to guide the Explorer to look for functions capable of processing its results.
Connecting and disconnecting nodes
To establish a new flow of data, you have to create a connection between an output port and an input port (including self port). There is no a single best way to do it, it depends on your preferences, graph complexity, zoom level and much more. Luna provides you with several alternative ways to connect and disconnect nodes, so you can choose the one which suits you most in a given situation.
Connecting nodes
By drag
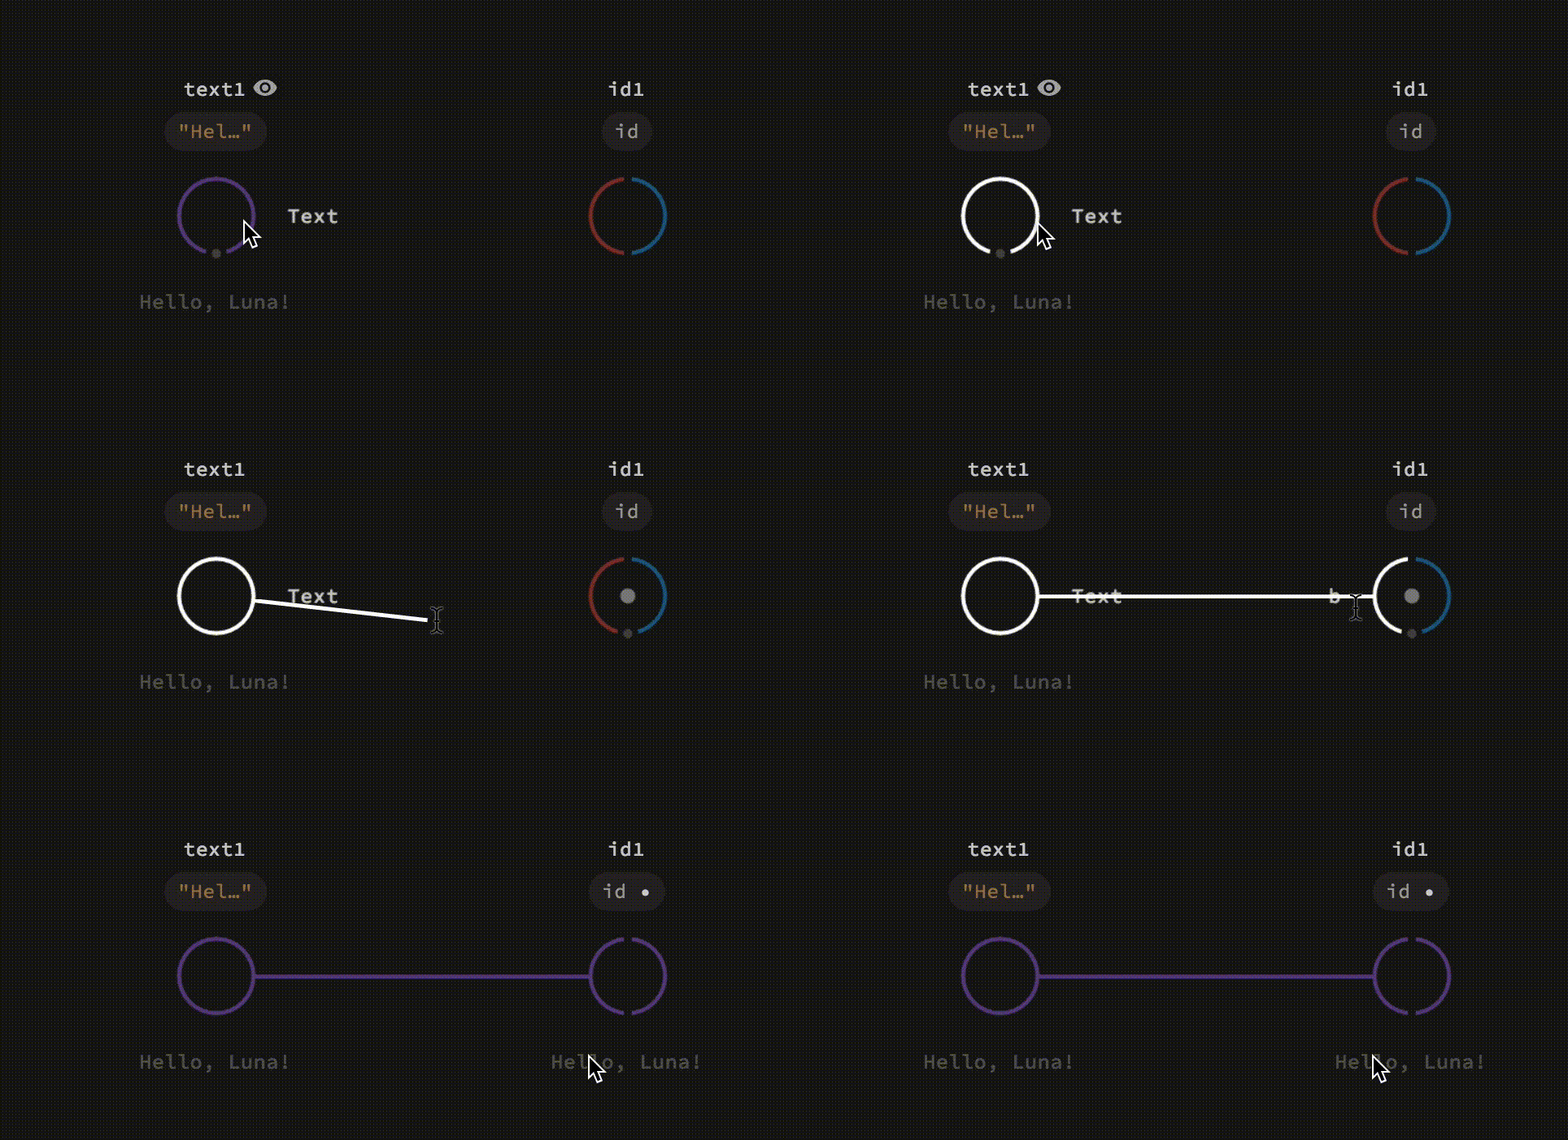
Press an output port, drag and drop it over desired input or self port. Alternatively you can press the input port, drag and drop it over desired output port. You cannot, however, start the connection by pressing the self port – pressing the node body selects the whole node instead. Drop over the background to cancel.
By click
Click (press and release) an output port, the connection will follow your mouse until you click again. Click on the desired input port or self port to create new connection or click on the background to cancel. You can alternatively click first on the input port and then on the output port. Click on the background to cancel.
Using connection pen Press and drag on the stage while holding the ctrl key to use the connection pen in connecting mode. A green stroke will follow your pointer and will connect all nodes on its way. Currently, if a connection pen connects two nodes, the results from the first one will be connected to the self port of the second node. This behavior will be enhanced soon and Luna will try to create connection between ports with matching types.

On creation Select a node before opening Explorer to guide it to search for functions associated with the node's results and automatically connect them to the self port of a newely created node.

Disconnecting and reconnecting nodes
By drag Press one of connection's ends to disconnect it and enter "connecting by drag" mode. You can drag and drop it over other port to reconnect or drop on the background to remove the connection.

By click Click one of connection's ends to disconnect it and enter "connecting by click" mode. You can click on other port to reconnect or click on the background to remove the connection.

By connecting to an occupied port Create a new connection using any above method to an input (or self) port which is already connected to replace the old connection with the new one.
Using connection pen Press and drag on the stage while holding both ctrl and shift keys to draw a stroke, which will disconnect every connection it crosses.

Node's details view
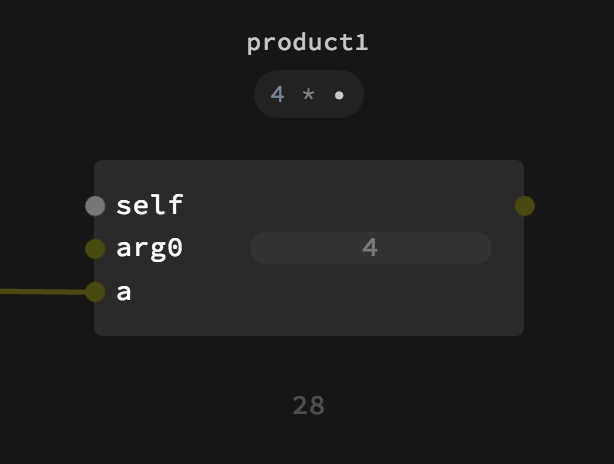
Luna allows you to display a node in either of two views – a compact, as seen above, or in a detailed one. The detailed view takes more screen space, however, it also provides widgets to interactively control the node's input values. To switch between the views, select the desired nodes and press the enter.
Parameters widgets
Every input to a node is called a parameter. A parameter can either be delivered by a connection or set manually using widgets.

Results visualisations
Every node is able to visualize its results. To open the visualization press the eye icon above the node. If you press and hold the space bar, the visualization will enter full-screen mode. You can also press space + ctrl to lock the visualization in full-screen mode (press esc to exit this view). You can choose which visualization to use from the drop-down visualizations menu available to the left of visualization.
[info] Changes ahead!
Currently, result visualisations are only available inside no–argument nodes. If there are any arguments on the left–hand–side bar of your workspace, this means that the results would depend on those arguments and we are not computing them. This will be changed soon, so you will be able to inspect the results with given input arguments. You can learn more more about functions and arguments in the Functions chapter.
Many visualizations provide interactive controls. In order to access them you have to focus the visualization by clicking on it. When you focus a visualization, the graph gets dimmed and you cannot control it until you exit the focus by pressing the escape key or pressing on the dimmed background.